You may love the new “tiles” half of the Start menu in Windows 10, or you may hate it. But it actually doesn’t matter how you feel about it; you can expand it, shrink it, customize it, or get rid of it altogether.
Here’s the complete list of things you can do to the right side of the Start menu — and the left side.
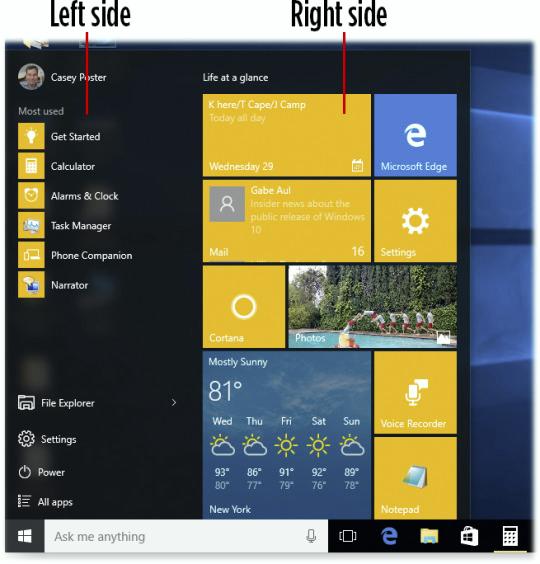
Right Side
Expand it: Drag
the top or right edge, using the mouse or trackpad. It snaps bigger or
smaller. (It doesn’t work with a finger on a touchscreen.)
Make it fill the entire screen: Right-click
anywhere on the desktop. From the shortcut menu, choose Personalize. On
the Settings screen, click Start, then turn on “Use Start full screen.”
In this mode, the left column of the Start menu is hidden. The live tiles area fills your entire desktop (which is handy for touchscreens).
Move a tile: With the Start menu open, drag a tile to a new spot.
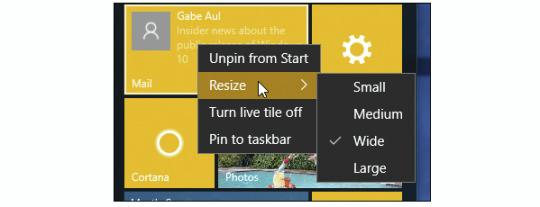
Resize a tile: Right-click
the tile. From the shortcut menu, choose Resize. You always have a
choice of Small and Medium; some apps offer Wide or Large options, too.
Add new tiles: Right-click any folder, disk, or app. From the shortcut menu, choose “Pin to Start.”
(Or open the “All apps” list, and right-click an app’s name there.)
Its tile now appears at the bottom of the right side of your Start menu.
Make a tile stop blinking: If you’d rather silence the animation of a “live tile,” right-click it. From the shortcut menu, choose “Turn live tile off.”
Remove a tile:
Open the Start menu. Right-click the tile you want to eliminate. From
the shortcut menu, choose “Unpin from Start.” (You’re not actually
discarding that item — you’re just getting its tile off the Start menu.)
Eliminate all tiles: Right-click each tile; choose “Unpin from Start.” Repeat until you’ve eliminated all the tiles. Now only the left-hand column remains, just as it was in Windows 7.
Change the color: Right-click
anywhere on the desktop. From the shortcut menu, choose Personalize. In
Settings, click Colors. You can change both the tile colors (“Accent
color”) and the background of the Start menu and taskbar (“Show color on
Start, taskbar, and action center”).
Left Side
Add new items: You can’t.
Remove items: You
can remove listings in the “Most used” section — handy if you’re
embarrassed about something that shows up there. To do that, right-click
its name. From the shortcut menu, choose “Remove from this list.”